6.28.2010

Granola


Granola is one of those things I never measured... I just slapped it together and it was always tasty.  People have asked for this recipe the most (second to my Derby Pie) and I think of it as although delicious and sustaining - not all that exciting - but it gets munched down in a hurry by all guests.  And it is certainly the most yearned for.  So I have measured this time in order to make the recipe.

The rules: The most important thing to avoiding the "bad stuff" is to use totally raw ingredients.  The roasting should be on your terms.  There were some well-intentioned (the worst usually are aren't they?) horrible laws past about pasteurizing nuts so if you can find RAW and UN-pasteurized that is best.  California likes to call pasteurized nuts still raw and that is a farce.  When you pasteurize nuts and seeds or grains you increase the chances for mold which is essentially poison.  If you eat something with mold it will make you rage and feel crazy.  If peanut butter was eaten and you're feeling particularly irritable or aggressive chances are the butter was made with moldy peanuts.  This happens often. (This explains a lot about my encounters with very aggressive homeless men - I'm a magnet for them.)

Now for the MAKING! This recipe makes the giant mason jar sized amount and maybe then some.  I triple it making about three giant masons (To feed Jason and friends like kings for weeks) and 2 regular sized masons (for giving away just because).

SAVE WHATEVER SOFT CHEWY THINGS YOU'LL BE ADDING TO THE GRANOLA FOR LAST.  If they are baked they'll dry out and have no chew to them.

What's in this batch:  (sometimes I add coconut, or cranberries or use a different mix of oats/grains)

Triticale:
Raw Almonds:
Raw Pumpkin seeds/pepitas:
Rolled oats:
Sunflower seeds:
Flax seed:

Zante currants (use whatever chewy fruit you like and in the amount you wish since this is personal taste and I simply eyeball it)

The consistency you want

"Small" batch:
  • 2-3 C oatmeal
  • 1 C triticale (or harder grain/oat)
  • 1 C almonds 
  • 1 C pepitas
  • 1 C sunflower
  • 1 C flax seeds ( Here is where you can add any special things to be roasted.  I sometimes do coconut in equal parts to the nuts and seeds.  The only brand that doesn't jack me up is Let's Do Organic.  But anything NOT sprayed at all is better than organic sprayed)  I put all of this into a big pot and stir it up then add 1- 1 and a 1/2 Cup honey. I don't like sweet granola so I prefer it to be enough to make everything stick to each other. Like the photo above, just enough to where everything it enjoying touching each other with not too much giant clumping. Jason likes it to be like candy, so if your family members like more you can add more but large clumps usually means it needs more stirring. If you use more syrup/binder then keep in mind it will clump more and the oven will break it up. You can add more at any stage even after you've put it into the pan to bake.

 You can use Agave, or Maple syrup.  But Raw honey is the best. The others SAY they are raw and are in fact pasteurized hard (unless you know the practices of a specific company who in fact does not - they would be an exception to the rule).  And on top of that the process to make Maple Syrup they boil sap repeatedly making it a bit unstable for those sensitive to "the spice."  There are some alternative syrups which are available and would be preferred to maple.  Like Alder sap which is sweet like maple and needs zero processing minus perhaps a sieve to remove natural debris and can be eaten straight up raw.

If you want to make a more paleolithic heavy mix double all seeds and nuts and use alder sap.

You can add cinnamon or ginger (I always recommend fresh) to this with wonderful results.

Preheat Oven to 250

Now that you've chosen your mix, and mixed your mix with your syrup you'll need a well oiled pan.  Olive oil or sunflower oil.  You should only need to oil this pan once no matter if there are 3 or 4 batches to roast. 

Raw and ready for the oven

You should roast your mix for 10-15 minute intervals decreasing the time as the batch goldens, removing to spatula mix it and removing outside ones to the middle or make certain nothing sticks to your pan. Then return it to the oven.  You'll keep up this tedium until everything starts to take on a golden brown and your house smells like an elf village. Once it is your level of golden brown.  Remove and put into a large bowl.  You'll add whatever dried fruit you like to it after it has cooled down a touch.  Mix thoroughly and taa daa!

Cooked on the left, Raw on the right

I put the granola into mason/kerr jars and give them away as gifts, take a jar in the car for a long trip or pour it into a bowl with goat milk.  It's my FAVORITE way to have this.   It also makes a RAD topping for baked berries.  Which you bake the fruit alone and then sprinkle on granola after.  Super fast dessert, easy breakfast and no fuss trail food.  So when you think you've gone to the oven about 70 times tell yourself all this goodness.

6.21.2010

Spinach pasta


When I was divorcing there were all of 5 things I think me and my beloved ex fought over and the fight was quite civilized.  We Rock, Paper, Scissored for them.  I don't see why this method isn't applied in courts. It is the only surefire unbiased method.  Anyhow, the pasta machine -- I lost.  But it made me gain the hand tools and for that I'm thankful.
Pasta is one of those things that cures me.  If I'm feeling particularly blue I must pretend that it is a beautiful sunny day with a bright lovely meal or if it is blowing cold winds then a nice toasty bowl of something calming and warming, and pasta can be both.  It is a little miracle worker.  Cold, hot, savory, spicy ... pasta is a great vehicle for what I need.  It takes love to make good pasta.  You can't do it halfway.  I make handcut pasta, no machine. I am the machine.  So this process is even soothing for me.  You don't even need a bowl - I make a bowl out of the flour on my counter.  Read everything through and then go for it.  It is simple once you're doing it.  There is no mistake making because you can always right it at any step.  If you find your fingers sticky with dough and you need to reach for something to add to the mix just have some standby flour for rubbing your hands with.  Using flour to rub the wet dough from your hands puts the dough back into the pile and off your hands without fuss. Water to clean dough hands will just make paper mache' glue in your sink. 

I have included a lot of photos NOT to intimidate but to demystify the process.  It is very simple once you've done it and then you have it in your cooking lexicon forever.

For about 4 main course or 8 side servings:

2 slightly heaping Cups unbleached flour (white flour will show off veggie pastas best - visually and tastewise)
2 tsp salt
1 Cup (a big fat handful) of Spinach leaves diced up as fine as possible
2 extra large eggs (2 duck or 1/10 an ostrich{jk}) or 3 large eggs
2 TBSP olive oil


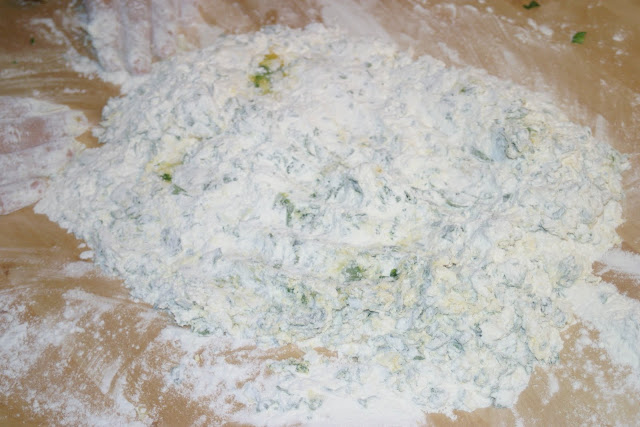
Pour the flour onto a large clean surface leaving it in a heap, push the measuring cup or your hand into it to make a little well to hold the other ingredients. Into the well put your eggs, salt, oil, veggie mash/puree and blend the eggs and others in the center and push some of the flour into the center collecting as much flour as it will carry. Clean off your fork into your pile and toss him somewhere out of the way. Get your hands in there and work the dough from this ugly stage into a ball. DO NOT WORRY if it looks like a massive failure. Pasta does that, it is a dirty trick it tries to play on you in a last ditch effort to not be eaten. It will comply with the palm of your hand. If you run out of flour and it wants more then add a little... if it is not blending and it is too dry then add a teaspoon of water until it gives up the goods and becomes blended.  I reserve one of my eggs until after the dough has used the first two up this helps get the remaining stubborn bits in line with the rest.


Third egg goes in to make the dough play nice.


Now that you have won and the ball is formed put it into either a covered bowl to rest or a plastic bag or even a towel or plastic sheet over it while on the board/counter (plastic makes it cooperate best). Have it rest for 10-20 minutes until it goes from dry and slightly leathery to lightly sticky and pliable. If not, give it a little more time. Clean up the chunky flour, sieve it and toss the chunks. Re-flour your big clean surface and press your ball out by hand into the floured surface allowing it to collect flour on both of its sides... form the ball into a rectangle to help you roll it out. Make certain flour is under it and roll, roll, roll, until it becomes smooth and thin.  It is best to check often to see if it is sticking to your surface and keep it well floured. The flour keeps the pasta dough from sticking to itself, the rolling pin and your surface all of which can drive you insane so be thorough.  This is the most time consuming part - the rolling.


 Once rolled out to be quite thin 1/16th of an inch? I don't know, I'm not an architect. Thin, but not totally translucent or anything. Flour the top which you were rolling on, flip and flour that side wipe off any extreme excess . Starting at one of the short sides roll it like a tube onto itself lightly.  (It is best if there is a nice even coat of flour on the surface so as you roll the pasta dough wont stick to itself and once you start cutting it will help the layers not stick either as they are mashed together.)


 Once you have your tube cut little slices all the way through to make pasta strands. They'll look like little snails and now they can be put somewhere to dry or can be cooked straight away. I used to dry them for awhile or overnight so they are toothy and firmer but I find that cooking it less yields a quicker and tastier product.  Fresh pasta does cook faster than boxed pasta so monitor it closely.  It cooks in almost half the time or even less.  Fresh pasta shouldn't be left unmonitored because it's cooking time is so short. 2-4 minutes


I'm a big big fan of handcut pasta as it catches sauce nicely and looks legit.  My favorite toppings for veggie pastas are more veggies.  The one pictured plated is mixed baby greens a drizzle of olive oil, coarse sea salt, goat feta, cracked pepper, and grated carrot.  It marries a salad with pasta and keeps away the mayo demons of pasta salads.  Our feta comes from Alsea Acre Goat Cheese via some good friends who are major supporters of their local farmers and local organic foods.  If you'd like to get it from Alsea directly and talk a bit or learn about them and their practices you can find them by clicking the linked name.

Mmmm, okay one more.

6.12.2010

On the bookshelf.

I have a lot of favorite things.  Probably more than is allowable by the definition of favorite.  I just want to share with you things I think are inspiring, insightful, helpful, and useful.

Book list:
Recipes, gardening, and harvest
  • The Encyclopedia of Country Living by Carla Emery (has everything from basic recipes to how to make soap or how to process food for home use, livestock care or how to profit from what skills you acquire from living in a basic way but this book is mostly a recipe and helpful hints/tips)
  • Smoking Salmon & Trout plus Canning, Freezing, Pickling & More by Jack Whelan.  I like the spiral binding far more than standard. This book it the most thorough on the subject I've found.
  • Backyard Homestead  produce all the food you need on a quarter acre! by Carleen Madigan  If you don't own land but you rent or own a little bit, this book can help you organize to maximize what you yield from it. (This book is best for the ambitious home gardener and even includes some recipes this is highly recommended to someone who wants their home to reflect the way homes once were but without necessarily having to give up city life) 


    Inspiration for the person wanting more than the rat race
    • On the Farm by Jimmy Doherty.  It is his journey through getting a defunct farm, restoring it and making it into a farm of Heritage livestock and an organic organism again. This is mostly an inspiring story and not a step by step of how best to deal with all lays of the land in any specific way.  More of a one man's journey kind of story.


    Living off the land from what it gives freely

    • Native American Ethnobotany by Daniel Moerman This book is really intensive study.
    • Natural Dyes and Home Dyeing by Rita Adrosko This contains recipes to yield natural dyes, very plain speaking.
    • Basic Butchering of Livestock & Game by John J. Mettler JR. DVM , If you're disgusted by the meat industry and don't want factory animals and wish them to have quality lives with quality food then a book on how you plan on getting them to the table could also be in order.  The closer you are to your food, the better it is.  If it is organic produce shipped from China chances are it is doing a lot more harm than good. 
    • Edible Wild Plants by Thomas Elias & Peter Dykeman This is organized by season which makes the search a bit simpler.
    • Peterson Field Guides Edible Wild Plants Eastern and Central North America by Lee Allen Peterson
    • Food Plants of Coastal First Peoples (for folks on the Western side) by Nancy J. Turner
    • Tom Brown's Field Guide to living with the Earth  This is written in a way that at times feels heavy handed although I believe he is genuine.  I think it is my bitterness that I may be imposing on his writing rather than him.  The information is accurate and thoughtful.  This is the most philosophical of the books mentioned in this entire list.


    Building shelter
    • Cordwood Building the State of the Art by Rob Roy - If you have a chunk of land a tree equals a house.  How to make a home out of what most people use for firewood.


    Lost skills, tools, and arts
    • A Museum of Early American Tools by Eric Sloane The most thorough and especially for its small size of early American tools and more importantly how they were used, crafted and replaced - other books on the subject leave all that out.  The illustrations are lovely.
    •  Back To Basics a Complete Guide To Traditional Skills by Abigail Gehring This book goes into good detail of the how to for a project, skill or an art.  From felling trees, making water pump itself, spinning wool or hooking a rug.  The book by the same people about Homesteading however is a let down. With only a very brief overview of what this book seems to be able to cover in a more concise way and with further breadth of topics.
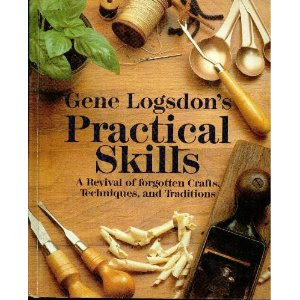
    • Gene Logsdon's Practical Skills  This is a favorite, the illustrations are beautiful;simple and quite easy to understand.  The projects even the more complex ones seem really obtainable through his gracefulness.
     

        6.09.2010

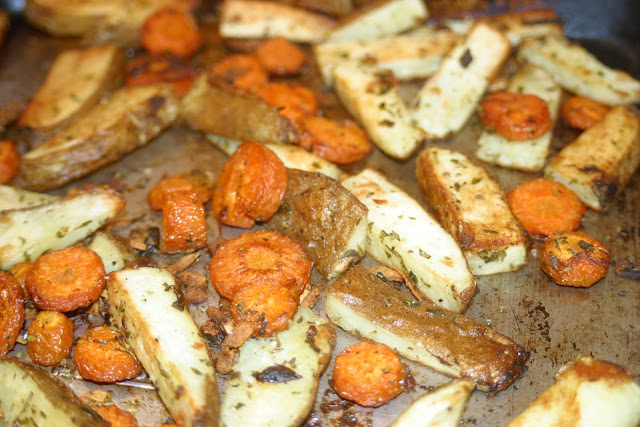
        Oven roasted herbed potatoes and carrots with pan fried Zucchini spears


        When it comes to dinner, I like things savory, spicy and hearty.  So, when I am imagining a menu, I try and find things that satisfy these cravings but are also simple and relatively quick to make.   This entry is going to detail one of my very favorite easy-to-cook meals.  I sometimes refer to these as "man meals" because they can be made just as easily on a camp stove as a regular oven, and bachelors with virtually no cooking skills can throw together a meal that is sure to impress a dinner guest.

        There are four components to this menu:  roasted root veggies, pan fried zucchini, mixed greens and a ketchup-like tomato sauce for dipping.


        First, the root veggies:
        • Pre-heat oven to 475 degrees
        • Cut your veggies (I used garlic, potato and carrot) into evenly-sized sections that will cook at approximately the same pace -- so if it's potatoes, they should be slices less than a half inch thick, same goes for carrot rounds, and any others.  Veggies that go great in this dish are rutabagas (peel them first), parsnip, carrots, potatoes, onion, hot peppers, and garlic cloves.
        • Put your mix of cut veggies in a large mixing bowl and add 1-3 Tbsp of sunflower or safflower oil (enough to coat your veggies)
        • Add finely chopped fresh herbs (rosemary, marjoram, thyme) in equal amounts to the the mix -- you want enough to see a speckle of each kind of herb on every piece of veggie
        • Add a tsp of coarse sea salt
        • Mix the herbs, oil, and veggies together until they are evenly coated.  Make sure that no veggies are dry or without herbs (you can grate some fresh black pepper over it here, or sprinkle hot pepper seeds to make it extra spicy)
        • Lightly oil your cookie sheet with sunflower or safflower oil.  Pour the mix onto a cookie sheet in a single layer, meaning that there are not veggies stacked on top of one another, and place in oven for 35 minutes, turning once 15 minutes in

          Once this is in the oven for 15 minutes, it's time to make the pan-fried zucchini!  Don't do it too early, or it will get soggy.
          • Start a pan warming up to medium high heat
          • Add 1 Tbsp of sunflower or safflower oil to the pan -- make sure it doesn't smoke as this means the pan is way too hot.
          • In a small, flat mixing bowl, pour in whole wheat (not enriched!) flour about an 1/8th of an inch deep
          • Add 1/2 tsp of cracked black pepper, and any savory dried herbs like oregano, basil, rosemary and thyme -- you can use an Italian or herbs de provence mix.  The herbs should be about 1 tsp worth.  Mix it until the flour and herbs are a uniform consistency.
          • Cut a single zucchini into long, flat sections.  If the skin is at all tough, peel it first.
          • Run each piece of zucchini under water for a moment so it is moist, no need for egg-- then dip it in the flour/herb mix so it has a thin coating of the flour/herb mix
          • Place the zucchini in the hot oiled frying pan and let them cook until the bottom is browned.  You want the flour to be completely cooked.
          • Once done, place the pieces on a paper towel, resting on a plate to absorb excess oil.  If the timing is right, the root veggies in the oven should be ready to come out shortly.
          Lastly, time to make some ketchup-like tomato dip.  This is optional because the other stuff is already super tasty.  I like it because it gives the meal more color and flexibility.
          • In a small bowl, add 1/2 Cup of crushed canned tomatoes -- make sure it's 100% tomato and nothing else
          • Add a pinch of allspice, clove, coriander, plus an even smaller pinch of something spicy like cayenne or dried hot peppers -- if you have a garlic powder you trust, add a pinch of that as well.
          • Add 1/2 tsp of coarse sea salt
          • Add 1 tsp of sugar, or honey  (you may want more depending on your taste, but mix first and let it sit before adding more -- too much sweet is no good)
          • Mix thoroughly and either serve cold, or heat the mixture and serve hot
          The last element is putting a nice bed of fresh raw greens on the side.  I recommend arugula, mustard, butter lettuce, cress, and turnip greens.   I'll make a note in a later potlicker on how to make your own "greens bed" in the back yard.

          So, once it's all done, plate it up and serve to whomever you want to be impressed with your mad cooking skills.

          6.07.2010

          My favorite chocolate cake (which happens to be vegan)


          I really dislike it when people turn their nose up immediately at something without knowing the thing.  It is far healthier to have some level of curiosity.  It seems that vegan things get the poking it with a stick treatment.  I don't get it.  There are some things labeled vegan that I think are quite unhealthy but not more unhealthy than a lot of heavily processed things.  If the thing you buy comes from a factory and is FORMED into a shape, that is something to beware no matter what the label states for the chosen diets of many.  But homemade with simple ingredients and called vegan it is hard to go wrong for anyone.

          Vegan for those who've missed out is anything that does not contain, use or is adulterated with any animal products.  This can mean something that may not injure the animal but just requires the animal to create it.  So honey is a common one I see being put into things and being called vegan by those who don't know that this is included in the "rule book."

          So on with it.  I am a chocolate snob.  I really dislike milk chocolate.  To me it tastes like a trailer park, skittles and milk scalded and formed in brown shapes.  It is a sweet I'm not into.  Dark chocolate on the other hand sends me.  I have never read a romance novel but I imagine it is something like that but with maybe more steamy sex scenes.  Well,  I love chocolate cake but so often they just end up hurting my teeth.  My mother was a fiend for Duncan Hines devil's food cake.  Which she made almost weekly for a good 6 years at one point.  I had never had a cavity and she has had full teeth replacement before 40.  Maybe it was the Duncan Hines maybe not.   For as fat as I was... I could never eat much of that crap.

          Later I read more about the difference in chocolates, cocoa and Cacao and found that dark chocolate the higher the cocoa content the better for you it is.  The properties of cacao is very potent and good for you.  But like all good things people try and make it gooder and Sppppffff make it crap instead.  Then the crap version gets famous and everyone knows it as the thing and the original thing becomes ancient and lost.  Chocolate is a power food when used well.  It can give you bursts of energy and alertness.  Which when combined with something that metabolizes slowly like whole wheat or oat flour (both of which are good for diabetic desserts) yields a pretty righteous midday snack or hiking food.   It can reduce hypertension, depression, inflammation (combined with hot peppers this is great for headaches that are related to swelling or other minor inflamed injury) .....................  You CAN have theobromine poisoning but it is largely from refined crap chocolate and usually happens to the ederly who gorge on it.  Do you bring a box of chocolates to your grandma along with everyone else?  Has Granicide been coined?

          Anyhow for all the awesome properties dark chocolate has, milk chocolate pretty much drops the ball. 

          Preheat oven to 350 degrees

          Ingredients

          • 1 Cup white unbleached flour
          • 1/2 Cup whole wheat (I try where I can to squeeze in a little)
          • 1 Cup vegan sugar *   (you can use less of course, and any additions you choose I'd adjust this amount as you only really need enough to take the edge off the cocoa's bitterness)
          • 1/3 Cup cocoa powder
          • 1 teaspoon baking soda
          • 1/2 teaspoon salt
          • 1/3 Cup olive oil
          • 1 tsp vanilla extract
          • pinch cinnamon
          • 1 Cup applesauce ( it should be JUST apples)
          I like to add 1/4 Cup 50/50 mix of chopped (chopping them up helps distribute a little throughout the whole recipe) chocolate chips.  My favorite is Dagoba 73% cacao.  They are expensive, but this is why a little goes a long way and I usually make fruit based things.  So splurge and get the best you can afford and keep it DEEP in the pantry until you can't handle it then make it using a small amount and hide it again!

          *If you add chocolate chips you can take out at least a 1/4 Cup of sugar and not taste it missing at all.

          This recipe is amazing with strawberries and I can only imagine how tasty it would be with walnuts.  

          Lightly grease one 9x5 inch loaf pan with olive oil. Sift together the flour, 1/2 the sugar, cocoa, baking soda and salt. Add the oil, vanilla, the other remaining sugar, pinch of cinnamon and applesauce. Mix together until smooth.  Scrape into prepared pan and bake at 350 degrees F for 45 minutes, 22 minutes for cupcakes.  Do I have to say again how impatient I am?  I do cupcakes!


          The not vegan bits:
           The strawberry cream is 1/4 cup whipped cream (the real stuff) and a cup of simmered strawberries allowed to cool.  Once the berries are cool then they can be blended with the whipped cream.  Of course the raw stuff is not second place and I completely recommend a pile of them on top!


          I have also made these and topped them with warm kumquat marmalade.  Totally ridiculous and amazing but not as awesome as strawberry's mellow awesomeness.

          6.04.2010

          Almond cheese cake


          For the cheese portion of the cake I make yogurt cheese.  The yogurt cheese takes 4-8 hours.  So beware of that before getting too excited.  This is not a difficult recipe, but it is certainly for the more patient.  I just hang my yogurt as soon as I get home from the store so that I have it ready to go since I can throw it back into it's original container and keep it refrigerated until time of use.   The awesome part is that the total active time on this dessert is maybe 30 minutes.  So it isn't time consuming, it just requires patience.  And the reward couldn't get much better.


          Oat flour oil pastry:
          Which is flaky, delicious and alright for those avoiding cholesterol or animal products (for other pies and tarts).

          • 1 heaping Cup oat flour  (pulse rolled oats until fine in a food processor)
          • 1 shallow cup of whole wheat pastry flour
          • 1/3 Cup -1/2 Cup olive oil
          • pinch of salt
          Blend all in a bowl until well combined the oil makes the flour stick to itself and you can pat out 4 small tart shells or one large one.  It is pretty easy to just press it into a tart pan without trying to roll it out which can take a little bit of wizardry to succeed.  Preheat oven to 450 bake 12-15 minutes checking to make sure its not over browning.  Take out let cool. Once the shell is cool - fill it with the blended filling.

          Cheesecake soft filling:  (which you'll need to adjust for your tart pans size)

          3/4 Cup whipping cream (liquid state)
          3/4 - 1 Cup yogurt cheese  (solid state)
          3 TBSP light brown sugar
          1-2 TBSP honey or agave (agave is better for diabetics and can replace brown sugar as well in a slightly smaller amount)
          1/2 tsp vanilla extract
          1/2 tsp almond extract   (if doing fruit topping just use vanilla and leave out the almond)


          Approximately 10 almonds for topping, chopped until able to be eaten easily with the cheesecake.


          Beat the hell out of the whipping cream until smooth but quite thick, too much and it starts to look like it has curds.  In a bowl put your yogurt cheese, sugars, extracts and beat so that the sugars are well combined and smooth with no chunks. Fold in the whipped cream until thoroughly combined.  Spoon into your tart shell and cover with almond pieces.  Place into the refrigerator for at least one hour.  More time is better but I know it is difficult to wait.  2-4 hours is ideal.  It makes a really lush texture.


          Even though the yield for the recipe above is for an 8 inch by 2 and 1/2 inch deep cheese cake... the pieces are rich, creamy and satisfying. Making 8 pieces like the one shown. So share it or horde it!

          6.03.2010

          Bird Nests : cookies for Marni.


          I made these to work on my obviously cookie deficient blog.
          They are vegan and I recommend them highly to ANYONE who likes chocolate and coconut.

          Preheat oven to 425.

          The dry bits:
          • 1 Cup whole wheat flour
          • 1/4 Cup unbleached white flour
          • 1/4 Cup  Oat flour (rolled oats tossed into a food processor and pulverized)
          • 1/4 Cup Baking Cocoa
          • 1/2 Cup vegan sugar
          • 1/4 Cup sugar in the raw or demerara sugar
          • 3/4 Cup coconut
          • 1/2 tsp allspice
          • 1/2 tsp or hefty pinch cinnamon

          Blend or finger sift everything together well!

          The wet bits:
          • 2/3 Cup - 3/4 Scant Cup olive oil  
          • 1 tsp vanilla extract (I add it to the olive oil to carry it throughout the mixture)
          • 1/2 Cup warm {tap hot} water (this is added in small amounts after everything is well blended to bind everything together tightly)


          After the mixture is blended with spoon or hands and the texture changes from grainy to like a sand castle building texture.  Just so it can hold its form enough.  Line a cookie sheet with foil.  Then make tiny 1 inch balls and press your thumb into their tops just to give them a little well for collecting your filling.  In the nest you can put a chocolate chip.  A filbert or macadamia nut.  I added a little dash more of coconut since that is what I had on hand.  Then pop into the oven.  These bake for no more than 5 minutes!   Once the shine from them is gone and the coconut is lightly toasted.  I made this with a mom in mind, so it's a time saver.  The recipe will make 48 tiny cookies.  Perfect for tiny hands. 


          These will keep well for at least a week.  You can measure out all of the dry ingredients and put it into a mason jar with a masking tape labeled - Bird Nests.  Good gift for family and friends.  Jar them and give with a little instruction card  for the wet ingredients needed and oven temp and timing stuck on the lid.